Berson Rolled Acoustic Underlayment
Ⅰ.PREPARATION
1.Subfloor Requirements
1) Hardness: No hollowing. No sand accumulation, sand loose, cracking while rubbing. Accord with architectural design requirements.
2) Flatness: Flatness should be measured with a 3-meter spirit level and a feeler gauge. It will be up to standard if the gap is below 3mm.
Take care NOT to have bulgy stones, nails, rebars on the subfloor. Any object that is sharp will pierce the acoustic underlayment and compromise its performance.
3) Cleanliness: Subfloors should be free of debris, paint, dust.
2. Dry Lay
Dry lay the rolls onto the subfloor to be acclimated at room temperature for a minimum of 24 hours before starting trimming and installation.
Ⅱ. INSTALLATION
1.Preparation
1) Clean the subfloor, grind all high spots. Check the subfloor hardness and see if there is floating ash. If it’s not hard enough or floating ash is found, approved materials should be used for improvement. Check the flatness. If it exceeds the allowed range or there are expansion joints, fill low spots with an approved patching/leveling compound.
2) Check the brand name, model, thickness and quantity of the acoustic underlayment.
3) Unroll the acoustic underlayment onto the floor and trim the ends as necessary in order to fit the surface area to be covered.
2.Installation
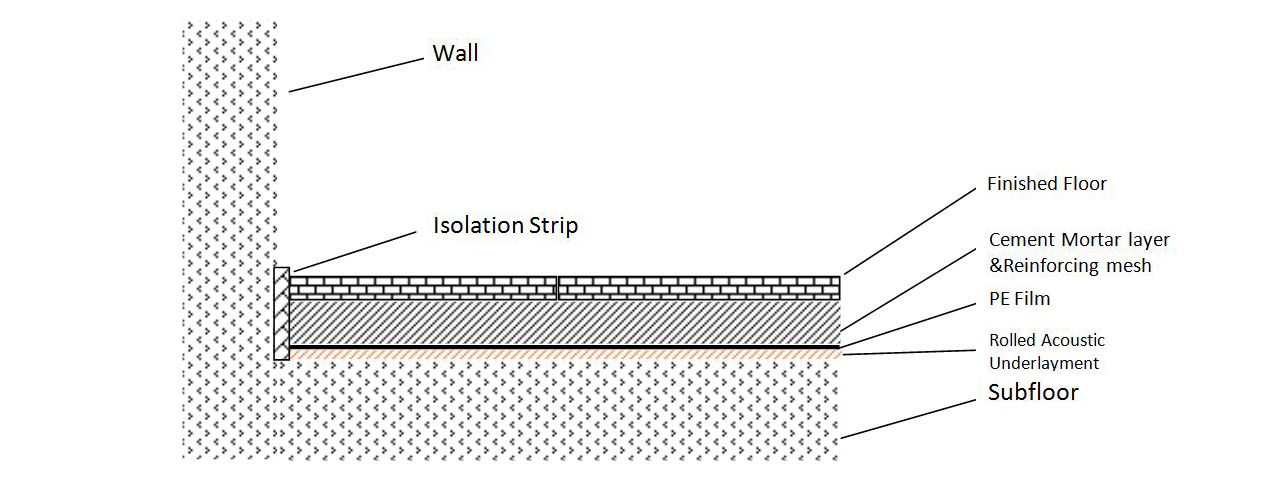
1) It is essential to install perimeter insolation strips to wall.
2) When dry lay, avoid unnecessary cutting or trimming to reduce roll joints. For those necessary joints, flexible sealant or oil-free asphalt can be used for sealing.
3) The underlayment shall be adhered to the substrate with cement glue or waterproof soft adhesive for translocation reduction.
4) Cover the underlayment with PE film(thickness +0.1mm, width 20cm wider than underlayment roll width, and the overlap +150mm).
3. Cement Mortar Construction
Lay the mixed mortar onto the underlayment which has been covered with PE, make it level and compacted. Make sure the cement mortar layer is not thinner than 40mm. Reinforcing mesh should be paved into the cement mortar.
4.Installation - the Finished Floors
1) Dry lay the finished floors onto the compacted cement mortar layer. If there is any hollowing, please remove the floors and fill up the layer with cement mortar. Make sure no hollowing.
2) When the cement mortar layer is acceptable for application, spread the approved adhesive on the bottom of the floor and lay it back on the position to be installed. Tap the finished floor with a rubber mallet from the center towards around. Make sure the floors flat and tight. The adhesive must be the one exclusively used for ceramic tile or marble. Full gluing down is required.
5. Important Information
1) The acoustic underlayment is not waterproof. It can not substitute for waterproof layer.
2) Installation direction for the acoustic underlayment and finished floors both is from the inside out. Keep foot traffic off the floor or keep the floor free from loads for a minimum of 48 hours.
6. Installation Diagram